Tracking Multiple Augmented Reality Markers with FLARManager and Papervision
This, the first in a line of tutorials here, is an in-depth walkthrough of how to create an augmented reality system in ActionScript with support for 3D objects manipulated via the Papervision framework.
A lucky few already know that I'm currently working on an augmented reality (AR) project, due to be complete in March this year. The project is that of a game which revolves around physical interaction via AR. However, I'll bore you with the details another day as right now we're here for something else.
If you haven't already seen what we'll be making today then have a quick gander at this video I made and all will become clear.
Prerequisites
This isn't a tutorial for beginners to AR or ActionScript so I'd advise you read up elsewhere and get comfortable with the basics before you tackle multiple markers.
Ideally you need to:
- Have a basic understanding of object oriented programming
- Be comfortable working with ActionScript
I'm using Flash Builder as my IDE of choice for this tutorial but feel free to use whatever you're most comfortable in. I've included a version in the source files that can be developed in Flash CS4, it's separate because you need to tweak a couple of files to get it working.
As well as basic AR tracking we'll learn how to add some Papervision3D objects into the fray.
We'll be using the following external resources:
- FLARManager — From which a lot of code for this tutorial comes from
- Papervision3D
Solving the problem
One of the most difficult issues I encountered during early development with AR is how to track multiple markers at once. Thanks to frameworks like FLARToolkit and FLARManager, tracking a single marker is relatively simple as you can code knowing that you'll only ever need to deal with one marker at a time. Your application inherits higher level of complexity when you want to reliably handle and track a dynamic amount of markers. Fortunately, if I do my job right, it will become dead easy after you've read this tutorial.
The solution lies in finding a way to store references of all the markers in view, or in use. From here we can refer to the stored reference whenever we want to update a marker. If we want to remove a marker from the system all we need to do is remove the reference, amongst a couple other things, but we'll get onto the nitty gritty further on. Enter the ActionScript Dictionary class.
Before we continue, let's take a moment to understand what the Dictionary class does and why we want to use it over common functionality like arrays and objects.
In brief, an array in ActionScript is only useful if you want numerical keys to reference the stored data. Although an array can use named keys in ActionScript, that is strings as keys, you wouldn't be able to utilise any of the built-in array functions. Objects on the other hand are built to use string keys which allow for more meaningful naming of properties. Dictionary objects are useful because they use objects themselves as keys. Besides this, the most important thing to understand about Dictionary objects are that they use strict equality [===] when referencing a key that is an object. The killer feature of the Dictionary object is that you can use the keys as you would a normal object, referencing properties and the like.
It may sound confusing, and it is, but there is a difference between Objects and Dictionaries. You could achieve the same functionality within this tutorial using Objects but I'll be using Dictionaries because of the strict referencing and the fact we can store objects within the keys. If you're still lost I'd advise reading through this article on the Dictionary class by Grant Skinner.
Setting up the project
The first thing we need to do is set up the core Flash Builder project. Now, we could do this manually by creating a new project and importing all the relevant files and packages into the right places, but we won't be doing that. Instead I've already created a basic project and we'll be importing that to save some time, you'll need to download and unpack the source files in preparation.
In Flash Builder, or your IDE of choice, you need to go to File→Import→Flash Builder Project…, or likewise.
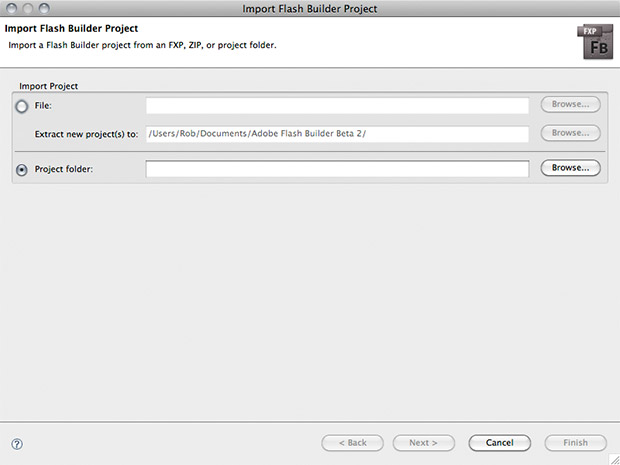
Flash Builder Project dialogue window
A dialogue window will spring up with a few options. Make sure Project folder is selected and then click browse, selecting the Multiple Markers Project folder from the source files you just downloaded. Once you've selected the project folder click finish and let the IDE do its thang. You should now have a new project showing up on the left of the IDE. These instructions may differ slightly for other IDEs, if nothing happened for you then you'll need to find out how to specifically import existing projects into your chosen IDE.
"Wow, this is a lot of effort just to begin", I hear you say. You're right, I reply, but we're nearly done. Last but not least is to open up the main ActionScript file, which is neatly tucked away within our new project folder. Double click on the folder and you'll be presented with a bunch more folders. Double click on src, then (default package), then Multiple_Markers.as. Bang. We're in business.
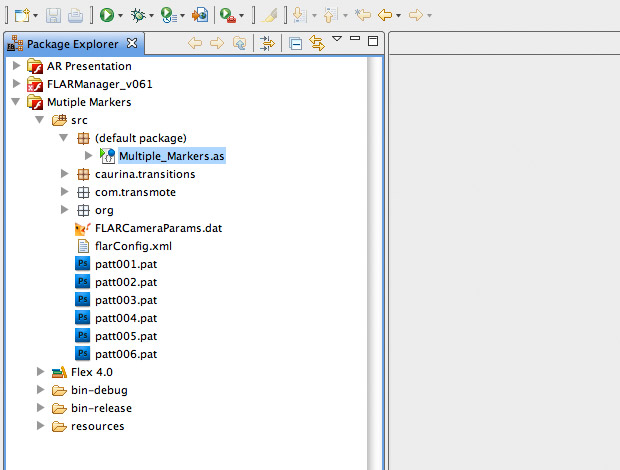
Flash Builder Project directory tree
The ActionScript file should've opened up on the right, if not then have a poke around for the file as it should be in there somewhere. You'll notice that I've already imported the required packages, but feel free to remove any you don't want if you're deviating from this tutorial. I've also included the following self-explanatory code to format the outputted SWF file when we're finished:
[SWF(width="640", height="480", frameRate="25", backgroundColor="#000000")]
All our code is going to go inside the Multiple_Markers class declaration:
public class Multiple_Markers extends Sprite {

}
That's enough setting up, let's crack on with what you came for.
Augmenting reality
Our system revolves around the FLARManager package, a wrapper of sorts that gives us access to all the exciting AR doo-dahs. We'll begin by prepping the system so it's ready to make reality awesome. Insert the following inside the Multiple_Markers class:
/* FLARManager pointer */
private var fm:FLARManager;

/* Constructor method */
public function Multiple_Markers() {
    /* Run augmented reality initialisation */
    this.initFLAR();
}
First we're setting the FLARManager variable fm that will hold our FLARManager object when we initialise it later. Next is the class constructor function that will run automatically when the system loads. Inside the constructor we're requesting the method initFLAR() which will hold all the code to initialise FLARManager. Let's create that method now by adding the following below the constructor method:
/* Augmented reality initialisation */
private function initFLAR():void {
    /* Initialise FLARManager */
    this.fm = new FLARManager("flarConfig.xml");

    /* Event listener for when a new marker is recognised */
    fm.addEventListener(FLARMarkerEvent.MARKER_ADDED, this.onAdded);
    /* Event listener for when a marker is removed */
    fm.addEventListener(FLARMarkerEvent.MARKER_REMOVED, this.onRemoved);
    /* Event listener for when the FLARManager object has loaded */
    fm.addEventListener(Event.INIT, this.onFlarManagerLoad);

    /* Display webcam */
    this.addChild(Sprite(fm.flarSource));
}
This really isn't anything complicated, all we've done is initialise a FLARManager object and create a bunch of event listeners that look out for; when an AR marker is detected, when an AR marker is removed, and when the FLARManager object has finished initialising. The last line uses our FLARManager object, referred from now as fm, to activate the user's webcam by adding it to the main stage.
For the meantime let's create some empty methods to keep the event listeners happy. Add the following underneath the initFLAR method:
/* Run if FLARManager object has loaded */
private function onFlarManagerLoad(e:Event):void {
    /* Remove event listener so this method doesn't run again */
    this.fm.removeEventListener(Event.INIT, this.onFlarManagerLoad);
}

/* Run when a new marker is recognised */
private function onAdded(e:FLARMarkerEvent):void {

}
/* Run when a marker is removed */
private function onRemoved(e:FLARMarkerEvent):void {

}
It's important to note that the first line in onFlarManagerLoad removes the fm initialisation event listener so it can only run once. The two marker listeners are passed a marker event object as an argument, which we'll use later to access detailed information about each marker.
By now we've created the underlying functionality for FLARManager, and if you run the system (?+F11 in Flash Builder) then your webcam should display in a Flash Player window. If not, then something went wrong and you'll need to have a look through the code again. If it still isn't working then post a message in the comments below.
The eagle-eyed of you will have noticed that I didn't talk about the flarConfig.xml argument in the fm initialisation. I have good reason as it's something that deserves some focus, of which it will now receive.
All about flarConfig.xml
If you look inside the src folder and double click on flarConfig.xml you'll be presented with the configuration settings for the fm object. The settings are split into 4 main areas; video source settings, FLARManager settings, camera parameters, and AR patterns. Transmote does a good job at explaining everything in detail in the official documentation so I'll be brief.
Video source settings
These are the settings which will define the dimensions that video is captured [sourceWidth & sourceHeight], dimensions that video is displayed [displayWidth & displayHeight], the framerate that video is captured at, and the amount of downsampling (scaling down) that the captured video receives before being processed. None of these settings affect the dimensions of the SWF window, those are changed by editing the line above the Multiple_Markers class declaration.
FLARManager settings
Slightly more advanced, these settings define if the video feed should be mirrored [mirrorDisplay], the amount of smoothing to give the AR marker animations [smoothing], the class to use for smoothing [smoother], and the accuracy of marker detection in changing light conditions [thresholdAdapter].
Camera parameters
A file has been provided by FLARManager, or more accurately by FLARToolkit, to compensate for webcam distortion and other gloriously exciting discrepancies. Point <cameraParamsFile> to the location of this file, which has already been done if you're using the source files I provided.
AR patterns
An array [<patterns>] of pattern files [<pattern>] that we want to detect. 6 pattern files have already been provided for you and can be printed from the Patterns folder in the unpacked source file I provided.
Bring on the markers
Now we're ready to start dealing with markers. Start by declaring our storage objects for the patterns and marker containers, of which we'll get to shortly. Add the following below private var fm:FLARManager; in the head of our class:
/* Vector storing references to all markers on screen, grouped by pattern id */
private var markersByPatternId:Vector.<Vector.<FLARMarker>>;
/* Dictionary storing references to marker containers, indexed by relevant marker object */
private var containersByMarker:Dictionary;
markersByPatternId is a Vector which is an array in which all the elements have the same data type. In our case we are creating a multi-dimensional Vector that we're saying must contain Vector objects, that in turn must contain FLARMarker objects. By restricting the data type like this we can rest assured that we'll be dealing exclusively with data we want.
containersByMarker is a Dictionary object which we'll be using later to manage the Papervision containers for each marker. They will make plenty of sense later so forget about them for now.
We can now finish off the initFLAR method by inserting the following underneath this.fm = new FLARManager("flarConfig.xml");:
/* Temporary declaration of how many patterns are being used */
var numPatterns:int = 6;
/* Initialise markerByPatternId vector object */
this.markersByPatternId = new Vector.<Vector.<FLARMarker>>(numPatterns, true);
/* Loop through each pattern */
while (numPatterns--) {
    /* Add empty Vector to each pattern */
    this.markersByPatternId[numPatterns] = new Vector.<FLARMarker>();
}

/* Initialise empty containersByMarker dictionary object */
this.containersByMarker = new Dictionary(true);
numPatterns is an integer that tells us how many patterns we declared in the configuration file. On the next line we define markersByPatternId to create a Vector object with 6 [numPatterns] empty slots and use true to make sure this value can't be changed dynamically in the future. The while statement loops through the Vector object we just created and adds another empty Vector to each of the 6 elements (one for each pattern). We didn't set a limit or boolean value this time because we don't know how many markers we'll be tracking. Finally we define containersByMarker as an empty Dictionary object and enable garbage collection on the included objects by including the true argument. It's not important to know what the garbage collection is doing right now, I just thought it best to highlight that it's enabled.
While we're at it we can finish off the two marker event listeners. First off add the following to our onAdded method:
/* Run method to add a new marker */
this.addMarker(e.marker);
And the following to the onRemoved method:
/* Run method to remove a marker */
this.removeMarker(e.marker);
All that's happening here is a call to the addMarker and removeMarker methods with the added/removed marker object attached. It's by sheer coincidence that we're going to create these two methods right now.
Insert the following below the onRemoved method:
/* Add a new marker to the system */
private function addMarker(marker:FLARMarker):void {
    /* Store reference to list of existing markers with same pattern id */
    var markerList:Vector.<FLARMarker> = this.markersByPatternId[marker.patternId];
    /* Add new marker to the list */
    markerList.push(marker);
}
This method will provide the core functionality for adding new markers to the system. Right now it's set up to store a reference to each marker the system detects. By passing a marker object to addMarker we're able to access a variety of information about the marker in question. We use this information to find out the marker's pattern id [marker.patternId] or, in layman's terms, the numerical position of the pattern in the configuration file pattern list (a number from 0 to 5, remember that arrays are 0 indexed).
Now that we know the pattern id we can access the relevant markersByPatternId Vector object for that pattern, from the 6 we created earlier, and store a reference in the temporary markerList variable. All the last line does is push [add] a reference to the new marker onto the end of the markerList Vector object. When populated, the markersByPatternId Vector object will contain references to every marker, grouped by their pattern id [0-5]. It's important to get your head around how this works so take a moment to read over everything again if necessary.
Add the removeMarker method directly underneath the addMarker method:
/* Remove a marker from the system */
private function removeMarker(marker:FLARMarker):void {
    /* Store reference to list of existing markers with same pattern id */
    var markerList:Vector.<FLARMarker> = this.markersByPatternId[marker.patternId];
    /* Find index value of marker to be removed */
    var markerIndex:uint = markerList.indexOf(marker);
    /* If marker exists in markerList */
    if (markerIndex != -1) {
        /* Remove marker from markersByPatternId */
        markerList.splice(markerIndex, 1);
    }
}
You'll recognise the first line is pretty much the same as in addMarker, referencing the markersByPatternId Vector object for the selected marker's pattern id. To remove the referenced marker from our Vector object we first need to find out the position [index] of the marker within the Vector. To do so we utilise the built-in indexOf method and pass it the marker we're looking for. In return we'll be given an integer, either the index of the marker (if it's found), or -1 if the marker can't be found. This result is then stored in matkerIndex so we can use it later.
Welcome to later. Now we have the result of our marker search we run a basic if statement to check if we actually found a marker. If so then we splice [remove] the marker from the markerList Vector object. Job done. Feel free to run the system to make sure there are no errors. You could print some markers and add a basic trace message, like below, if you want to see an output when you introduce a marker to the display:
trace("Added marker with pattern id: "+marker.patternId);
Congratulations, you've successfully implemented a fully functioning AR system that detects multiple markers. However, it's mighty boring as it stands. How about we create something nice to look at? Agreed? Fantastic.
Entering the third dimension
Flash was never really built to handle much more than 2D graphics, and rolling our own 3D engine would be way beyond the scope of this tutorial. Luckily for us a group of bright young developers put together Papervision, an incredibly awesome 3D engine that does everything we need and more.
There are a few bits and pieces that need addressing before we can start breaking down the second dimension. First up is setting some variables that we're going to be using for Papervision later on. Insert the following below private var fm:FLARManager; in the head of our class:
/* Papervision Scene3D pointer */
private var scene3D:Scene3D;
/* Papervision Viewport3D pointer */
private var viewport3D:Viewport3D;
/* FLARToolkit FLARCamera3D pointer */
private var camera3D:FLARCamera3D;
/* Papervision PointLight3D pointer */
private var pointLight3D:PointLight3D;
/* Papervision render engine pointer */
private var lre:LazyRenderEngine;
Variables should be pretty standard to you by now so we'll cut to the chase and take a moment to go through what the referenced Papervision classes actually do.
Scene3Dis a container for the 3D environment and is where all our 3D objects will be placed.Viewport3Dis literally a window into the 3D environment.FLARCamera3Dis a special FLARToolkit class that extends the PapervisionCamera3Dclass, accounting for webcam distortion. It's purpose is to let us move around, with the 3D environment changing depending on our position. Just like when you move around, the objects your looking at will change their size and perspective.PointLight3Dis a light which points in one direction, it illuminates theScene3Dso we can create shadows.LazyRenderEngineputs everything together. It displays theScene3Denvironment as seen through theViewport3Dwindow from theFLARCamera3Dposition.
Insert the following method call after the event listener in onFlarManagerLoad:
/* Run Papervision initialisation method */
this.initPaperVision();
We'll create that method call now. Add the following below our removeMarker method:
/* Papervision initialisation method */
private function initPaperVision():void {
    /* Initialise a new Papervision scene */
    this.scene3D = new Scene3D();
    /* Initialise a new FLARCamera3D object to enable full AR goodness */
    this.camera3D = new FLARCamera3D(this.fm.cameraParams);

    /* Define a new Papervision viewport object */
    this.viewport3D = new Viewport3D(640, 480, true);
    /* Add viewport to the main scene */
    this.addChild(this.viewport3D);

    /* Define a new Papervision point light */
    this.pointLight3D = new PointLight3D(true, false);
    /* Set light position */
    this.pointLight3D.x = 1000;
    this.pointLight3D.y = 1000;
    this.pointLight3D.z = -1000;
    /* Add light to the Papervision scene */
    this.scene3D.addChild(pointLight3D);

    /* Initialise the Papervision render engine */
    this.lre = new LazyRenderEngine(this.scene3D, this.camera3D, this.viewport3D);

    /* Create event listner to run a method on each frame */
    this.addEventListener(Event.ENTER_FRAME, this.onEnterFrame);
}
There is nothing scary happening here. In the first line we are defining our Scene3D object. In the second we define our FLARCamera3D object and pass it a reference to the camera parameters file we talked about in the FLARManager configuration. The same goes for the third line where we define our Viewport3D object and make it the same dimensions as the SWF, also setting the third argument to true so it scales with the main stage. On the next line we add the Viewport3D object to the main stage.
On the fifth line we define our PointLight3D object and set the first argument to true so the light is visible. In the lines that follow we set the position of the light in 3D space, z being the depth. You can set these value as you wish, there is no specific reason to use 1000. After setting the positions we add the light to the scene3D object so it illuminates whatever 3D objects we decide to put in later.
Next we define the Papervision rendering engine and pass it our scene3D, camera3D, and viewport3D objects as arguments. There are a few rendering engines to choose from but I'm used to the LazyRenderingEngine so that's what we're going with here.
Currently our system won't display anything and will only run once, for a successful animation we need to update our 3D scene on every frame. To do that we create a new event listener on the main stage that calls the onEnterFrame method at the beginning of every new frame (30 frames per second).
Now would definitely be a good time to create that onEnterFrame method we just declared. Insert the following below the initPaperVision method:
/* Method to run on each frame */
private function onEnterFrame(e:Event):void {
    /* Render the Papervision scene */
    this.lre.render();
}
What this method does is call the LazyRenderEngine's render method on every single frame, which will update the 3D scene and thus create the illusion of movement. However, if you run the system right now you'll see we don't have anything to display yet. The fact that nothing went wrong tells you that the Papervision environment is working, but that's not much fun so let's attach some 3D cubes to our markers.
Visualising the markers
This is easily the largest and most complex section of the tutorial so it's worth taking a breather before we continue. Go on, I'm not joking around here. Done? Good. Set your tea down on the desk and let's well and truly shatter the second dimension.
Add the following underneath our onEnterFrame method, at the very end of the class:
/* Get colour values dependent on pattern id */
private function getColorByPatternId(patternId:int, shaded:Boolean = false):Number {
    switch (patternId) {
        case 0:
            if (!shaded)
                return 0xFF1919;
            return 0x730000;
        case 1:
            if (!shaded)
                return 0xFF19E8;
            return 0x730067;
        case 2:
            if (!shaded)
                return 0x9E19FF;
            return 0x420073;
        case 3:
            if (!shaded)
                return 0x192EFF;
            return 0x000A73;
        case 4:
            if (!shaded)
                return 0x1996FF;
            return 0x003E73;
        case 5:
            if (!shaded)
                return 0x19FDFF;
            return 0x007273;
        default:
            if (!shaded)
                return 0xCCCCCC;
            return 0x666666;
    }
}
getColorByPatternId is a helper method that we'll be using to grab the colour values for each of our 6 patterns. By assigning a separate colour to each pattern we can easily distinguish between different markers on the screen. I've included some extra functionality to give a darker shade if we set the shaded boolean to false. Let's forget about getColorByPatternId for now as it will make more sense when we come to use it.
The process going on when creating a 3D cube, and most other objects, in Papervision is actually a pretty simple one:
- Create a 3D container for the object
- Define materials for the object
- Create the object and add the materials
- Add the object to the 3D container
- Add the 3D container to the Papervision scene
- Render the scene (usually done elsewhere in the system)
As you can see it's not exactly rocket science to get 3D objects into Flash with Papervision. Most of the steps mentioned are literally one line of code, 2 at most. All the code we're using for creating the 3D cubes will be done in addMarker, so that's where we'll go now. Add the following at the end of the method (before the last curly brace):
/* Initialise the marker container object */
var container:DisplayObject3D = new DisplayObject3D();

/* Prepare material to be used by the Papervision cube based on pattern id */
var flatShaderMat:FlatShadeMaterial = new FlatShadeMaterial(this.pointLight3D, this.getColorByPatternId(marker.patternId), this.getColorByPatternId(marker.patternId, true));
/* Add material to all sides of the cube */
var cubeMaterials:MaterialsList = new MaterialsList({all: flatShaderMat});

/* Initialise the cube with material and set dimensions of all sides to 40 */
var cube:Cube = new Cube(cubeMaterials, 40, 40, 40);
This code should make some sense if you read it through like the process I defined above. In the first line we're creating a new DisplayObject3D, our 3D container for the object. The next two lines define the materials we want to use on each cube. I'll focus on this a little as it's important to grasp how materials work in Papervision.
Adding materials to an object in Papervision is usually a one or two step process, depending on how messy you want the code to be; first defining the material you want to use then, second, adding that material to the object. Some objects require multiple materials, like a cube, but the premise is the same; materials should be seen as separate to the objects they're being added to. The great thing about Papervision is that you have a whole variety of material types at your disposal. Whether you want block colours or a movie, there are material types to handle it, and if you want to get advanced you have a selection of shaded material types to use as well. I won't go into detail about how to define each type of material, but the method we use for the cube is very similar, if not a little more complex.
In our code, on the second uncommented line, we define the type of material we're after; a FlatShadeMaterial. This material type reacts to light in the 3D scene and shades certain areas. To define the FlatShadeMaterial we pass the pointLight3D from our Papervision scene, along with the colours we want to use for lit, and unlit sides. Instead of using arbitrary colours we grab the patternId of our marker and use that to get the relevant colour from the getColorByPatternId method we created earlier, passing a boolean value of true to the second request so we get the relevant shaded colour instead. I told you it'd make more sense when we came to use it.
As we're create a cube we need to define materials for all of the 6 faces. To do this we define a MaterialsList object which we use to assign materials to each side. The parameters of the MaterialsList object allow us to assign a different material for each side. For our purposes a single material for all sides is just fine, which is why we're using the all parameter.
Now we have the materials sorted out we can move onto step 3 and actually create the object, our cube. To do so we define a Cube object, passing in the MaterialsList object we just created, as well as the dimensions [width, depth, height] of the cube (you can actually make it a cuboid shape if you wish). That's all for creating a cube, it really is as easy as that. The cube isn't actually visible yet as we haven't added it to the Papervision scene, so the next few lines of code will prepare us to do that. Add the following below the cube definition:
/* Shift cube upwards so it sits on top of paper instead of being cut half-way */
cube.z = 0.5 * 40;

/* Add finished cube object to marker container */
container.addChild(cube);
/* Add marker container to the Papervision scene */
this.scene3D.addChild(container);

/* Add marker container to containersByMarker Dictionary object */
this.containersByMarker[marker] = container;
There is nothing crazy going on here. First we change the Z position of the cube to raise it by half it's height. We do this because the registration point of a cube in Papervision, the origin from which movement and rotation is made, is slap bang inside the core, right in the middle of the cube. If we left the Z position as it was then the cube would be sitting as if it was sliced in half, so we raise it up by half to make it sit on the bottom surface.
On the next two lines we add the cube as a child of the DisplayObject3D, our 3D container, and then add that container as a child of the Papervision scene. This is vital as without adding the cube to the scene it will never be rendered.
It's all well and good adding the cube and container to the 3D scene, but without a method of tracking each object it would be a nightmare to manipulate or remove them in the future. This is why we created the containersByMarker Dictionary object previously. The last line of code above adds our newly created container to that object, referenced by the marker we're adding the cube to.
That's it for creating the cubes, now we move on to removing them. Add the following at the end of the removeMarker method:
/* Store reference to marker container from containersByMarker Dictionary object */
var container:DisplayObject3D = this.containersByMarker[marker];
/* If a container exists */
if (container) {
    /* Remove container from the Papervision scene */
    this.scene3D.removeChild(container);
}
/* Remove container reference from containersByMarker Dictionary object */
delete this.containersByMarker[marker];
This is basically a reversal of the additions we made when adding a cube. In the first line we create a reference to the 3D container stored in the containersByMarker Dictionary object for the current marker (see how useful it is now?). From here we run a simple validation check to make sure a container actually exists and, if so, remove it from the Papervision scene. Finally we delete any reference to the container in the Dictionary object. All gone!
We're so nearly there, all that's left is to create the method that will run every frame updating the whole system. Below the onEnterFrame method, add a new method called updateMarkers with the following code inside:
/* Update markers method */
private function updateMarkers():void {
    /* Store reference to amount of patterns being tracked */
    var i:int = this.markersByPatternId.length;
    /* Store reference to list of existing markers */
    var markerList:Vector.<FLARMarker>;
    /* Empty marker variable */
    var marker:FLARMarker;
    /* Empty container variable */
    var container:DisplayObject3D;
    /* Empty integer */
    var j:int;

    /* Loop through all tracked patterns */
    while (i--) {

    }
}
Integral to the update method is a while statement that loops through all the AR patterns we want to track. Before we delve into the loop we need to set up a few variables:
irefers to the length [number of] AR patterns we want to trackmarkerListdefines an emptyVectorthat will holdFLARMarkerobjectsmarkerdefines aFLARMarkerobject that will refer to the current markercontainerdefines aDisplayObject3Dthat will refer to the current 3D containerjdefines an integer that we'll use further within the loop
Let's tackle the loop now. Add the following inside the while statement:
/* Store reference to all markers with this pattern id */
markerList = this.markersByPatternId[i];
/* Amount of markers with this pattern */
j = markerList.length;
/* Loop through markers with this pattern */
while (j--) {
    /* Store reference to current marker */
    marker = markerList[j];

    /* Find reference to marker container in containersByMarker Dictionary object */
    container = this.containersByMarker[marker];
    /* Transform container to new position in 3d space */
    container.transform = FLARPVGeomUtils.convertFLARMatrixToPVMatrix(marker.transformMatrix);
}
There is only one line here which is new to use, but we'll leave that until last. First off we grab an array of markers being stored in this.markersByPatternId for the current pattern id [i] and add it to the markerList variable we defined previously. From here we find out how many markers being tracked, the length, and store that value in the variable j. To loop through each marker we set up a new while statement using j. In each iteration of the marker loop we grab a reference to the current marker from markerList and store it in the marker variable. In turn we then use marker to retrieve the relevant 3D container from the containersByMarker Dictionary.
Finally, and I know you've been waiting for this moment, we update the position of the container relative to the AR marker being held up. To do this we use a rather nifty method provided by FLARManager called convertFLARMatrixToPVMatrix. What this method does it take the FLARMarker transformation matrix, the size, rotation and position, of the marker, and convert it into a Papervision transformation matrix. All that's left is to assign that converted matrix to the transform property of the 3D container and it will match the position and orientation of the AR marker. Pretty cool if I do say so myself.
Now, there is no use having an method to update the markers if we don't use it anywhere, so add the following call above this.lre.render() in the onEnterFrame method:
/* Run method to update markers */
this.updateMarkers();
Now would be a good time to save, grab one of the AR markers, and run the system to check it works. If you see a cube pop up over your marker then congratulations, you've just created a fully functioning augmented reality system with Papervision. Over. Out. Finished. Finito. Completed.
Rounding up what's been covered
We certainly learnt a lot in this tutorial, with particular focus on FLARManager and Papervision. We learnt:
- About the Dictionary and Vector classes in ActionScript
- How to implement basic AR support in ActionScript
- How to create basic 3D objects in Papervision
- How to impress your friends with pure awesomeness
Ok, so the last one is a bit extravagant but I'm yet to find someone who doesn't stare at my computer screen when I'm working on AR in the library. Annoying? Perhaps. Cool points? Definitely.
Taking this further
I've given you a firm understanding of the basics and a platform to launch yourself into the exciting depths of AR. What happens next is up to you, but here are a few ideas:
- Adding a tween to the cubes to animate them when they're created
- Animating the cubes so they constantly rotate on the spot
- Replacing the cubes with something more exciting
- Implementing collision detection between the cubes [advanced]
If you do decide to take this further, add a link in the comments as I'd love to see.
Source files
All the source files referenced in this tutorial can be downloaded under a Creative Commons Attribution-Non-Commercial-Share Alike license  .
.